Setting up a malware analysis lab requires virtualization software, a Windows virtual machine, and the right tools. Microsoft offers free Windows 10 VMs that expire after 90 days, and utilities like FLARE VM can automatically install analysis tools. Proper network isolation and disabling Windows Defender are essential steps before examining specimens.

If you’d like to start experimenting with malware analysis in your own lab, here’s how to download and set up a free Windows virtual machine:
- Step 1: Install Virtualization Software
- Step 2: Get a Windows Virtual Machine
- Step 3: Update the VM and Install Malware Analysis Tools
- Step 4: Isolate the Analysis VM and Disable Windows Defender AV
- Step 5: Analyze Some Malware
Step 1: Install Virtualization Software
Install virtualization software that you feel comfortable configuring and troubleshooting. VirtualBox and Hyper-V are good free options. If you want to set up a headless server for your lab, you’ll probably like VMware vSphere Hypervisor (formerly called ESXi), which is also free.
If using VMware Workstation, you’ll need the commercial version: Workstation Pro for Windows and Linux or Fusion Pro for macOS. The free versions don’t support snapshots. You’ll want snapshots when examining malware, so you can revert the VM’s state to start a new investigation or backtrack an analysis step. VMware provides a free 30-day trial.
Step 2: Get a Windows Virtual Machine
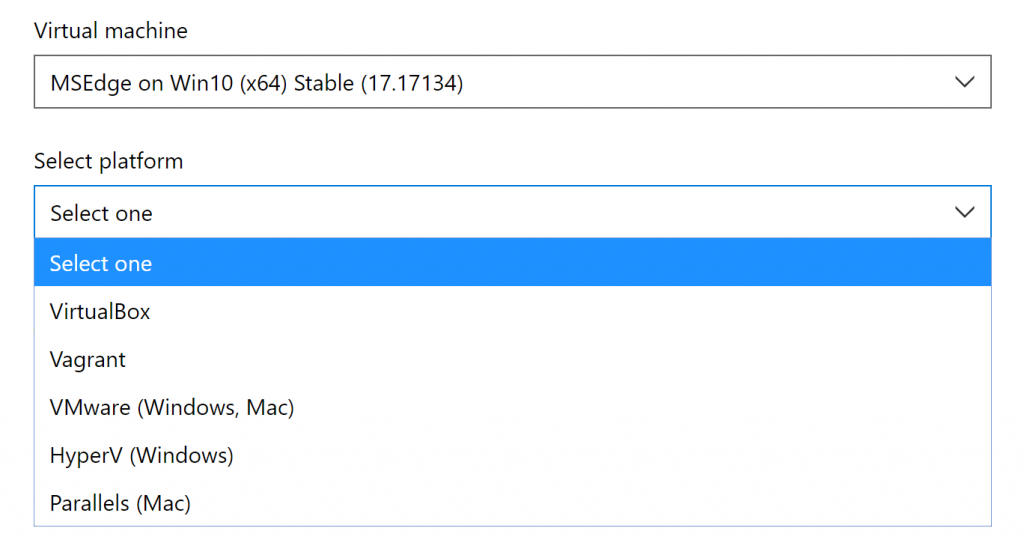
If you don’t have a licensed version of Windows for your virtual machine, you can download a free Windows 10 VM from Microsoft. Go to the Microsoft Edge page for downloading virtual machines. Select “MSEdge on Win 10 (x64)” and pick the virtualization platform that matches the one you have:
If using macOS, you might be unable to extract the zip file’s contents unless you download a file extractor such as The Unarchiver.
After downloading and extracting the archive, follow the steps appropriate for your virtualization software to start the VM. For example, for VMware you’d extract the files into a dedicated folder, then launch the file named “MSEdge - Win10.vmx”.
The Windows OS in this VM expires after 90 days. Microsoft recommends “setting a snapshot when you first install the virtual machine which you can roll back to later.”
The password Microsoft assigned to this virtual machine is “Passw0rd!” You won’t need it for starting the VM, which will automatically log you in, but you might need to supply it when configuring the OS or installing software.
Step 3: Update the VM and Install Malware Analysis Tools
When you first boot the VM, it will be able to connect to the internet, assuming your physical host has internet access. You can use this connection to update the OS to the latest patch level and install malware analysis tools.
Next, install malware analysis tools. Here are some of my favorite free Windows tools for examining malicious software in a lab:
- Behavioral analysis: Process Monitor, ProcDOT, Process Hacker, Wireshark
- Code analysis: PeStudio, IDA Freeware, x64dbg, Scylla
You can also automatically install lots of free malware analysis tools using the FLARE VM distribution:
If you wish, install in the VM utilities such as VirtualBox Guest Additions and VMware Tools, which come with your virtualization software. They will make it convenient to share clipboard contents and files between your physical host and the VM. However, their presence slightly increases the chances that malware might detect the virtualized environment or manage to escape.
If you won’t be using the file sharing methods supported by your virtualization software, decide how you’ll transfer files in and out of the VM. Accessing a USB key from within the VM is a reasonable option. Another one is SFTP: You can enable the SSH server built into Windows, then access it from your physical host or from another VM using an SFTP client, such as WinSCP.
Step 4: Isolate the Analysis VM and Disable Windows Defender AV
Shut down your VM.
Consider disabling shared folders for the virtual machine, to make it harder for malware to escape. For example, to do that in VMware Workstation Pro, go to VM > Settings… > Options > Shared Folders and click Disabled.
Change the network settings for the VM so it doesn’t have any network access. For instance, in VMware Workstation Pro you could put it into Host-Only mode by going to VM > Settings… > Hardware > Network Adapter and selecting Host-Only:
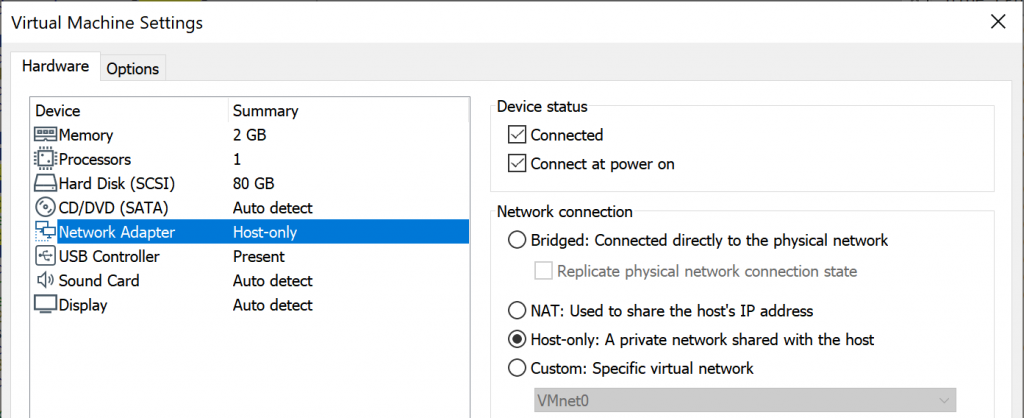
A host-only network makes it possible for the VM to communicate with the virtual adapter of your physical host. For better isolation, consider defining a dedicated virtual network just for your virtual machine, then configure the VM to use that custom network. If you do this, then you won’t be able to use SFTP to transfer files between the VM and your physical host.
Start your VM, now that it’s no longer connected to the physical network.
Disable Windows Defender Antivirus inside the virtual machine, so the AV doesn’t interfere with your malware analysis efforts. Use Group Policy to do this to avoid Windows periodically re-enabling AV. Optionally, use Group Policy to disable Windows Updates.
Once the VM is configured the way you like it, take a snapshot.
Be careful to avoid infecting the wrong system when analyzing malware and to minimize the chances that your specimen will escape. Strongly consider dedicating a physical host to such research; don’t use this system for other tasks and don’t connect it to a production network.
Step 5: Analyze Some Malware
You’re ready to analyze some malware! I created lots of free resources for people looking to start learning malware analysis, in addition to the Reverse-Engineering Malware course
I teach at SANS Institute:
- Reverse-Engineering Malware Cheat Sheet
- Analyzing Malicious Documents Cheat Sheet
- Tips for Reverse-Engineering Malicious Code
- Mastering 4 Stages of Malware Analysis
- Introduction to Malware Analysis Webcast
Happy learning!