Tunneling connections through a VPN in a public cloud helps conceal your origin and safeguard traffic when performing security research or connecting over untrusted networks. Algo VPN is an open-source bundle designed for self-hosted VPN services that's easy to deploy on DigitalOcean and relies only on modern protocols and ciphers.

When performing security research or connecting over untrusted networks, it’s often useful to tunnel connections through a VPN in a public cloud. This approach helps conceal your origin and safeguard your traffic, contributing to OPSEC when interacting with malicious infrastructure or traversing hostile environments.
One way to accomplish this is to set up your own VPN server, as an alternative to relying on a commercial VPN service. The following tutorial explains how to deploy the Algo VPN software bundle on DigitalOcean (the link includes my referral code). I like using DigitalOcean for this purpose because it offers virtual machines (VMs) for as little as $4 per month; also, I find it easier to use than other cloud services.
Algo VPN Overview
Algo VPN is an open-source software bundle designed for self-hosted VPN services. It was designed by the folks at Trail of Bits to be easy to deploy, rely only on modern protocols and ciphers, and provide reasonable security defaults. Also, it doesn’t require dedicated VPN client software for connecting from most systems and devices, because of native IPSec support. It also supports WireGuard.
To understand why its creators believe Algo VPN is a better alternative to commercial VPNs and OpenVPN, read the blog post that announced Algo’s initial release. As outlined in the post, Algo VPN is meant “to be easy to set up. That way, you start it when you need it, and tear it down before anyone can figure out the service you’re routing your traffic through.”
Creating a DigitalOcean VM
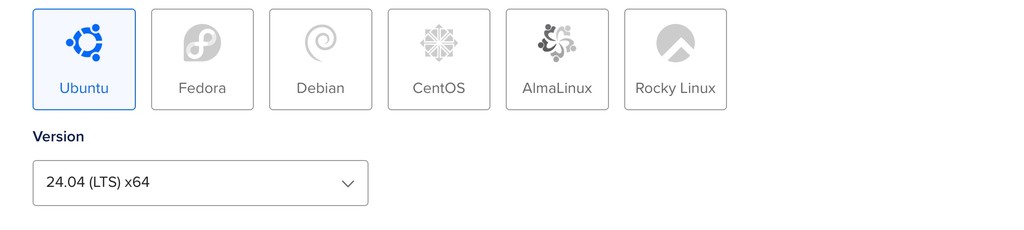
To obtain an Internet-accessible system where you’ll install Algo VPN server software, you can create a “droplet” on DigitalOcean running Ubuntu with a few clicks. To do that, pick the geographic region where the VM will run based on your requirements. Then, on the DigitalOcean Create Droplets page, select the Ubuntu icon. DigitalOcean defaults to the latest Ubuntu release, but Algo VPN currently requires Ubuntu 22.04, so click the version dropdown and select “22.04 (LTS) x64.” Alternatively, Algo can create the droplet for you automatically using a DigitalOcean API token.
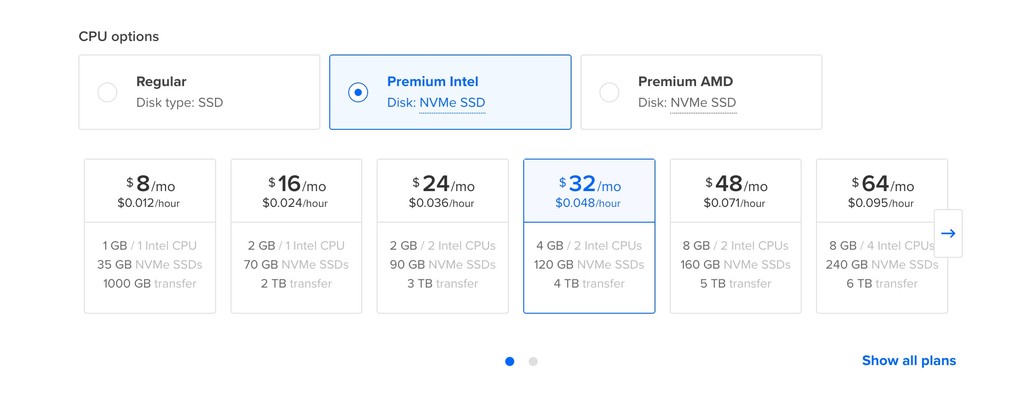
If you’re not planning to tunnel a lot of traffic through the system, selecting the least expensive size will probably suffice: As the Droplet Type, go with “Shared CPU” “Basic.” DigitalOcean defaults to “Premium Intel” for the CPU options, which starts at $8 per month:
To access the $4-per-month tier, switch the CPU option to “Regular” (Disk type: SSD) and select the $4/mo droplet:
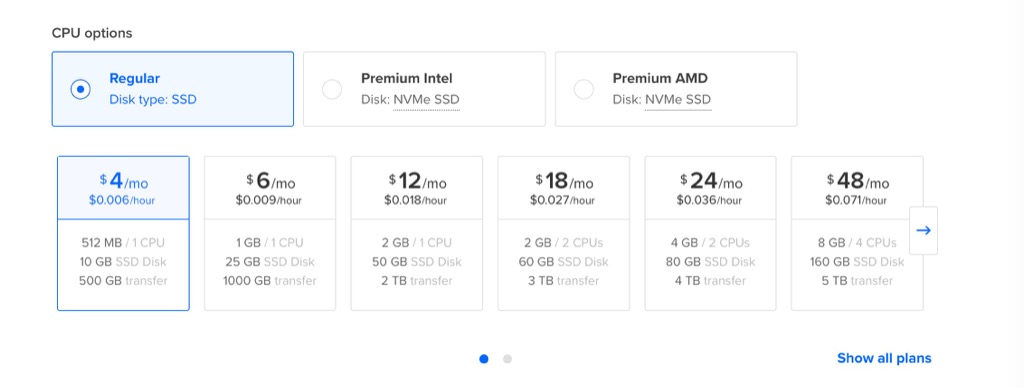
If the $4 data center isn’t available in the region that you selected earlier, pick another one. Assign a hostname that appeals to you.
Once the new host is active, make a note of the public IP address that DigitalOcean assigns to it and log into it using SSH. Then run the following commands inside your VM to update its OS:
apt -y update
apt -y upgrade
Follow the prompts as necessary, accepting default settings if prompted to complete the updates. When done, reboot the VM by typing:
rebootAfter the VM reboots, log back into it. At this point, you could harden the configuration of your VM, but these steps are outside the scope of this guide.
Installing Algo VPN Server Software
Next, obtain the latest Algo VPN server software on the newly-setup droplet:
git clone https://github.com/trailofbits/algo
cd algo
Next, set up the username(s) for the people who will be using the VPN. To accomplish this, use your favorite text editor, such as Nano or Vim, to edit the config.cfg file in the ~/algo directory:
vim config.cfgIf you wish, remove the lines that represent the default users phone, laptop, and desktop and add your own (e.g., john) so that the corresponding section of the file looks like this:
users:
 - john
To improve your server’s security posture, consider enabling the unattended_reboot option so it looks like this:
unattended_reboot:
  enabled: true
  time: 06:00
Set the reboot time so it’s least likely to inconvenience you or otherwise interfere with the server’s operation.
After saving the file and exiting the text editor, execute the following command in the ~/algo directory. The first time you run it, the script uses the uv package manager to set up its Python dependencies. Since uv isn’t in Ubuntu’s default repositories, the script offers a few ways to install it. Choose the pipx option, which works well. Once that’s done, the installer launches automatically:
./algoWhen prompted by the installer, “What provider would you like to use?” select “Install to existing Ubuntu latest LTS server (for more advanced users).”
When proceeding with the installer, you should be OK in most cases by accepting default answers. For example, when asked to enter “the IP address of your server,” press Enter to accept the default “localhost” value.
When asked about the public IP address of the server, enter the IP address that was assigned to your VM by DigitalOcean when you created the droplet.
After providing the answers, give the installer a few minutes to complete its tasks. Be patient. Once it finishes, you’ll see the “Congratulations!” message, stating that your Algo VPN server is running.
Be sure to capture the “p12 and SSH keys password for new users” that the installer will display at the end as part of the congratulatory message because you will need to use it later. Store it in a safe place, such as your password vault.
Configuring VPN Clients
Once you’ve set up the Algo VPN service, configure your VPN client. The Algo setup process generates VPN client configuration files that allow you to easily complete the setup. It stores the files under ~/algo/configs in a subdirectory whose name matches your server’s IP address.
In most cases, start by installing the WireGuard VPN client for your OS (get the app for macOS, iOS, Android, or Windows). Next:
- For iOS and Android, use the WireGuard app to scan the QR code PNG image that Algo generated and placed in the wireguard subdirectory on your server.
- For Windows and macOS, use the WireGuard app to “Import tunnel(s) from file…” and point it to the .conf file that Algo generated and placed in the wireguard subdirectory on your server.
If you don’t want to install WireGuard on your iOS device, you can follow Algo’s instructions to configure the built-in IPSec VPN client for Apple devices.
If using the WireGuard VPN client, use it to activate your Algo VPN tunnel.
Additional Considerations for Algo VPN
Before relying on a VPN to safeguard your interactions with malicious infrastructure, be sure to confirm that it’s concealing the necessary aspects of your origin. If it’s working properly, the remote host should see the IP address of your VPN servers, instead of the IP address of your VPN client. Similarly, your DNS traffic should be getting directed through the VPN tunnel, concealing your client’s locally-configured DNS server. One way to validate this is to use whoer.net, comparing what information the site reveals before and after you activate your VPN connection. Also, confirm that you’re not leaking your origin over IPv6; one way to do that is by connecting to ipv6leak.com.
You can turn off your VM when you don’t need it. When you boot it up again, Algo VPN software will automatically launch in the background. If running the server for longer periods, you should implement security measures appropriate for Internet-connected infrastructure.
As you use your Algo VPN, adversaries might begin tracking the server’s IP address and eventually blacklist it. Therefore, it’s a good idea to periodically destroy this DigitalOcean droplet and create a new one from scratch. This will not only change the server’s IP address but also ensure that you’re running the latest version of VPN software and its dependencies. Unfortunately, after you do this, you’ll need to re-import VPN configuration details to match the new server’s IP address and certificate.